

 by
by 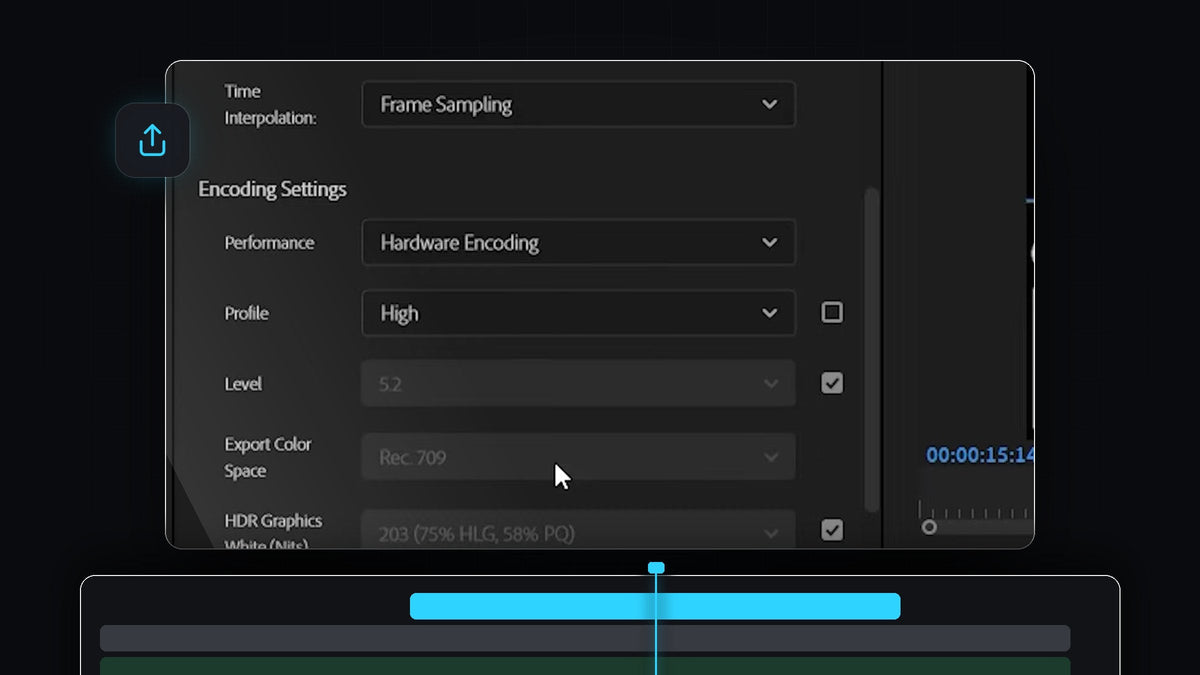
Watch the tutorial
Step 1: Match the source settings
Open the export window with Ctrl+M (Cmd+M on a Mac), choose your format, and then expand the Video section. At the top of Basic Video Settings you will find the Match Source button. Click it and Premiere Pro fills in Frame Size, Frame Rate, Field Order and Aspect to match your sequence.
This is almost always what you want, because exporting at a different size or frame rate than you edited in forces Premiere Pro to rescale or resample your footage. If one of the values is not right for your project, uncheck the box next to it and pick the correct setting from the dropdown.

Step 2: Turn on maximum depth and render quality
Click More to reveal the advanced options. Check Render at Maximum Depth and Use Maximum Render Quality. Both settings make Premiere Pro process your effects, scaling and color at higher precision, which keeps gradients smooth and avoids banding. The trade-off is a slightly longer export, which is usually worth it for a final delivery file.

Step 3: Set the encoding performance, profile and level
Scroll down to Encoding Settings. Set Performance to Hardware Encoding so your graphics card does the heavy lifting and the export finishes faster. Then uncheck the box next to Profile and set it to High. The Level should be 5.2. If it is greyed out or set to something else, uncheck the box next to it and choose 5.2 from the list.
If you do not see Hardware Encoding in the dropdown, your computer or Premiere Pro version may not support it for that format. Software encoding works too, it just takes longer.

Step 4: Choose VBR 1 pass and a target bitrate
Scroll to Bitrate Settings and set Bitrate Encoding to VBR, 1 pass. Variable bitrate gives complex scenes more data and simple scenes less, so you get good quality at a reasonable size. A single pass is also much faster than two.
The Target Bitrate slider controls the trade-off. Moving it up improves video quality but also grows the file size. A good bitrate depends on your resolution and frame rate, so use the chart below as a starting point.


Step 5: Set up the audio
Last, expand the Audio section. Set Audio Format and Audio Codec to AAC, Sample Rate to 48000 Hz and Bitrate to 320 kbps. 48 kHz is the standard sample rate for video, and 320 kbps AAC sounds clean while adding very little to the file size.
Now press Export and enjoy a clean file. If you need the basics first, read how to export video in Premiere Pro. If you plan to export many videos, click the save icon next to the Preset dropdown to store these settings as your own preset, so you never have to rebuild them.
Tips
- Check the sequence first. Match Source reads from your sequence, so make sure the sequence settings are correct before you export.
- Do not oversize the bitrate. Going far above the chart numbers mostly makes the file bigger without a visible improvement, especially on platforms that recompress your upload anyway.
- Save a preset. Store your settings once and reuse them for every project.
FAQ
What are the best export settings for Premiere Pro?
Use Match Source for the video settings, turn on maximum depth and render quality, use Hardware Encoding with the High profile and level 5.2, choose VBR, 1 pass with a bitrate from the chart, and finish with AAC audio at 48000 Hz and 320 kbps.
What bitrate should I use for 1080p?
The chart in the video suggests around 8 Mbps for standard frame rates (24, 25, 30) and around 12 Mbps for high frame rates (48, 50, 60).
Why is Hardware Encoding missing?
It depends on your graphics card, drivers and the format you picked. If it is not listed, export with software encoding instead.
If you want your edits to look great before they reach the export stage, try our 500+ Premiere Pro presets.


