

 by
by 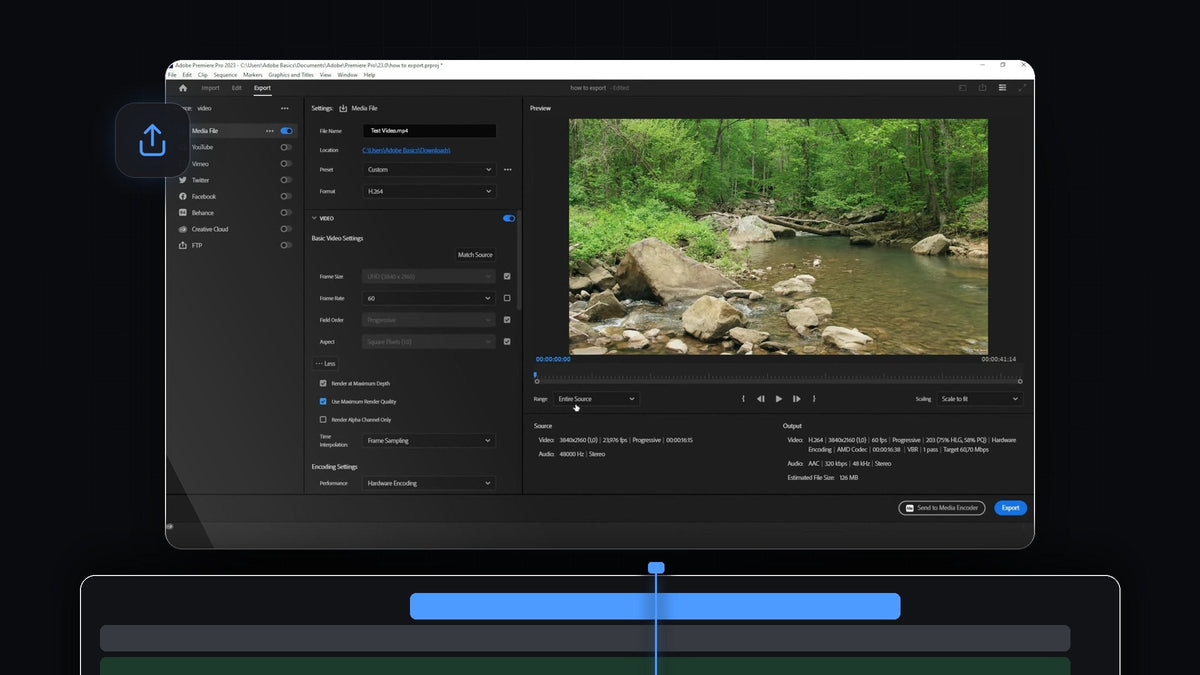
Watch the tutorial
Step 1: Open the export settings
Click your sequence in the timeline so that it is active, then go to File > Export > Media. You can also press Ctrl+M on Windows or Command+M on a Mac, which is much faster. Premiere opens the Export tab, with the settings on the left and a preview of your video on the right.
The same Export submenu also has Send to Adobe Media Encoder (Alt+Shift+M). That option renders in the background so you can keep editing while the export runs.

Step 2: Name your file and choose a location
At the top of the Media File settings, click the File Name field and type a name for the finished video, for example "Test Video.mp4". Under it, click the blue Location link. A Save As window opens where you pick the folder, such as Downloads or a dedicated exports folder, and click Save.
Step 3: Choose a preset
Open the Preset dropdown. Your recent presets are at the top, followed by the favorites. The list includes Match Source - Adaptive High Bitrate, Medium Bitrate and Low Bitrate, plus High Quality 2160p 4K, High Quality 1080p HD, High Quality 720p HD and High Quality 480p SD Wide.
If you are not sure, a Match Source preset is a safe choice because it follows the size and frame rate of your sequence. Pick a lower bitrate for a smaller file, or a higher one for better quality.

Step 4: Pick the format
The Format dropdown decides which type of file you get. For almost everything, including YouTube, Instagram and TikTok, you want H.264, which creates an MP4 file. The list also has formats like Animated GIF, AVI, AIFF and AAC Audio for audio-only files, and more further down, such as HEVC (H.265), JPEG and MP3.

Step 5: Fine tune the video settings
Expand the Video section to see Basic Video Settings. By default the Frame Size, Field Order and Aspect follow your source. To change a value, uncheck the small box next to it. In the video the Frame Rate is unchecked and changed from 23.976 to 60. Keep in mind that a higher frame rate than your footage does not add detail, so only change it when you have a reason.
Click More to reveal extra options. The video turns on Render at Maximum Depth and Use Maximum Render Quality, which can improve quality but make the export slower. Leave Render Alpha Channel Only off. Below it, Time Interpolation stays on Frame Sampling.

Step 6: Save your own preset
When your settings are right, do not repeat the work next time. Click the three dots next to the Preset dropdown, choose Save preset and type a name in the Choose Name box. Your preset then shows up in the preset list, ready to use on any project.
Step 7: Export the video
Check the Range setting under the preview. Entire Source exports the whole sequence, while you can also export only a part by setting in and out points first. At the bottom right, the Source and Output summary shows the final resolution, frame rate and the Estimated File Size, so you know what to expect.
Then click the blue Export button. An Encoding video window with a progress bar and the estimated time remaining appears. When it finishes, open the folder you chose in step 2 and your video is ready to play and upload.
Tips
- Check the estimated file size. It updates when you change the preset or bitrate, so you can aim for a size that suits the platform you upload to.
- Use the same preset for the same job. One saved preset for YouTube and one for short vertical clips saves time on every export.
- Watch the file once. Play the exported file from start to finish before you upload it, to make sure nothing is missing.
FAQ
What is the shortcut to export in Premiere Pro?
Press Ctrl+M on Windows or Command+M on a Mac to open the export settings. The same command lives under File > Export > Media.
Which format should I choose to export a video in Premiere Pro?
H.264 is the best all-round choice. It creates MP4 files that work on YouTube, social media and nearly every device.
What is the difference between Export and Send to Media Encoder?
Export renders inside Premiere Pro. Send to Media Encoder hands the job to Adobe Media Encoder, which renders in the background while you keep working in Premiere.
Want to speed up the rest of your editing workflow before you export? See the Premiere Pro plugins collection.


