by
by 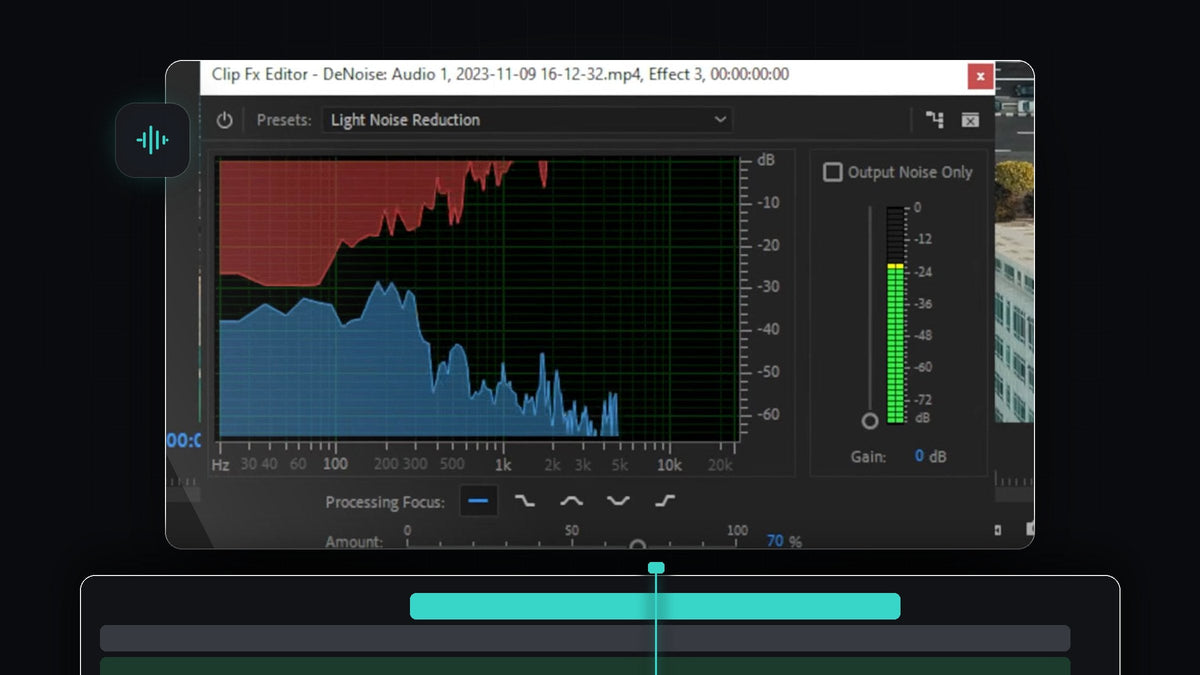
Watch the tutorial
Step 1: Apply the DeNoise effect to the audio
Open the Effects panel (Window > Effects) and type denoise into the search box. You will find DeNoise under Audio Effects > Noise Reduction/Restoration. Drag it onto the audio layer of the clip that has the background noise. Make sure you drop it on the audio track, not the video track.

Step 2: Open the effect editor
With the audio clip selected, open Effect Controls and find DeNoise. Next to Custom Setup, click the Edit button. This opens the Clip Fx Editor, a window where you can see and shape the noise reduction.

Step 3: Choose a preset
Click the Presets menu at the top of the window and pick the one that fits your clip. Use Heavy Noise Reduction if the recording has a lot of background noise. Use Light Noise Reduction if there is only a little. Start with the lighter one, because heavy settings can make a voice sound thin or watery.

Step 4: Read the blue and red waves
When you play the clip back, the graph fills with blue and red shapes. The blue area is your original audio. The red area shows the frequencies that Premiere is going to remove. If red covers frequencies where your voice lives, the reduction may be too aggressive for your recording.
Step 5: Adjust the Amount slider
Drag the Amount slider at the bottom of the window to control how much noise is removed. Higher means stronger reduction. Play the clip while you move it and listen, and pick the point where the noise is gone but the voice still sounds clear. You can also switch between presets again to compare results, as each one gives a slightly different outcome.
Step 6: Target specific frequencies with Processing Focus
For more control, use the Processing Focus buttons next to the graph. They tell the effect which frequency range to concentrate on, so you can aim the reduction at the part of the sound where the noise sits, such as low rumble or high hiss, instead of the whole spectrum.

Tips
- Less is more. A little remaining noise sounds more natural than a voice that has been over-processed.
- Listen with headphones. Artifacts and a watery sound are much easier to hear than on laptop speakers.
- Fix pops separately. DeNoise handles steady noise. For sharp mic pops, use a dedicated fix instead.
FAQ
How do I remove background noise from audio in Premiere Pro?
Apply the DeNoise effect to your audio clip, open the editor with the Edit button, choose a Light or Heavy Noise Reduction preset and adjust the Amount slider.
Where is the DeNoise effect in Premiere Pro?
Search for DeNoise in the Effects panel. It is in Audio Effects > Noise Reduction/Restoration.
Why does my voice sound strange after denoising?
The reduction is probably too strong. Lower the Amount slider or switch to the Light Noise Reduction preset so less of the voice is removed along with the noise.
Does your recording also have sharp mic pops? Fix them with the remove microphone pop download.